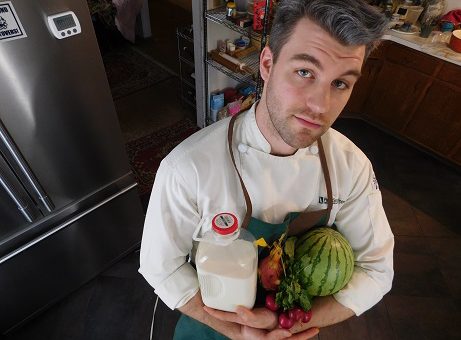
I figured I’d finish off this month of requests with something that almost seems like a rite of passage among video game food people, such as myself: the famously dubious cake from Portal.
All memes aside, this is actually a really delicious cake. It takes a lot of chocolate, but is perfect for special occasions; or birthdays, which is one of the reasons why I made it (my friend even brought over his Wheatly plush to be in the picture!). I hope you have a chance to try out the recipe sometime, because this really was a triumph.
Hey, how about now? Click ‘Continue Reading,’ and happy cooking, everyone! :]
+ Chocolate Cake +
ITEMS
| Ingredient | Amount |
|---|---|
| Sugar | 2 1/2 cups + 2 TBSP |
| Egg | 3 each |
| Vegetable Oil | 1 1/3 cup |
| Water | 20 oz |
| Salt | 1/2 tsp |
| Vanilla | 1 tsp |
| AP Flour | 2 3/4 cups + 1/4 cup for dusting the pans |
| Cocoa Powder | 1 1/3 cup |
| Baking Soda | 1 tsp |
EQUIP
- 2 x 8″ Cake Pans
- Electric Stand Mixer
- Rubber Spatula
- Large Mixing Bowl
- Sifter
- Parchment Paper
- Scissors + Pencil
- Pan Spray
- Toothpicks
- Serrated Knife
- Recommended: Cake Circles + Turntable (though, do not worry, as they aren’t necessary)
WALKTHROUGH
We’ll start by preparing the cake pans!
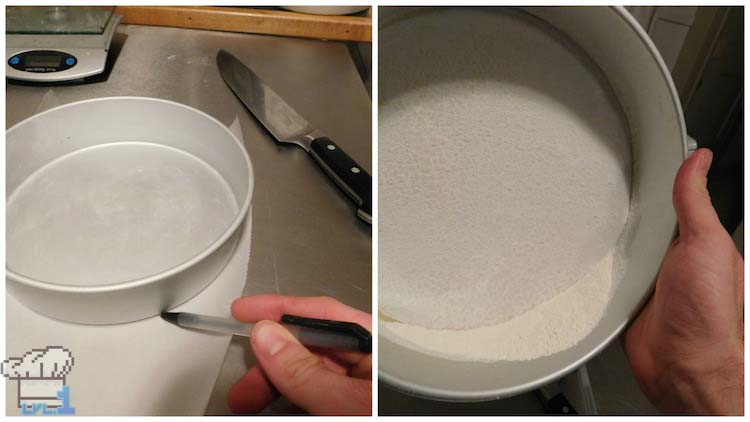
- Place each pan on top of a sheet of parchment paper wider than its base and use a pencil to trace a circle around it. Use a pair of scissors to cut out circles just inside the line you drew. Spray the inside of your cake pans with pan spray and insert the parchment circles.
- Spray the tops of the parchment circles, then toss about a 1/4 cup of flour into one of the pans. Shake the flour around, so that it forms an even covering on the bottom as well as the sides. You can firmly hit the side of the pan to remove loose flour. Do this to both pans, discarding the extra flour.
- Now for the cake! Preheat the oven to 350F. Add the sugar and eggs to the bowl of an electric mixer, fitted with the whisk attachment, and mix until combined. Slowly add the veg oil, water, vanilla, and salt while continuously mixing on low speed.
- While the wet ingredients are mixing, (I’m counting sugar as a wet ingredient here) we can combine the dry ingredients. Sift the AP flour, cocoa powder, and baking soda all together into a large mixing bowl.
- Turn the mixer off and add about 1/3 of the dry mix to the bowl, then resume mixing on low speed. No doubt the mixing bowl is pretty full at this point so don’t rush it, or there will be a mess to clean up (trust me!). After the first third of the dry has been incorporated, stop the machine and add the next third. Add the remaining dry in the same fashion while continuing to run the mixer until the batter is thoroughly combined and there are no more dry bits (you can increase the mixer speed a bit here to expedite the process). The batter will be very fluid, still, but don’t worry!
- Divide the batter evenly between the prepared cake pans. It’s a little less than 4 cups (or ~35oz) of batter per pan. Place the pans on a center rack of the oven and bake for 75 minutes, turning them once at around 30 minutes. This probably seems like a long time to bake a cake for (and it is) but trust me, you’ll get a really moist cake in the end :]
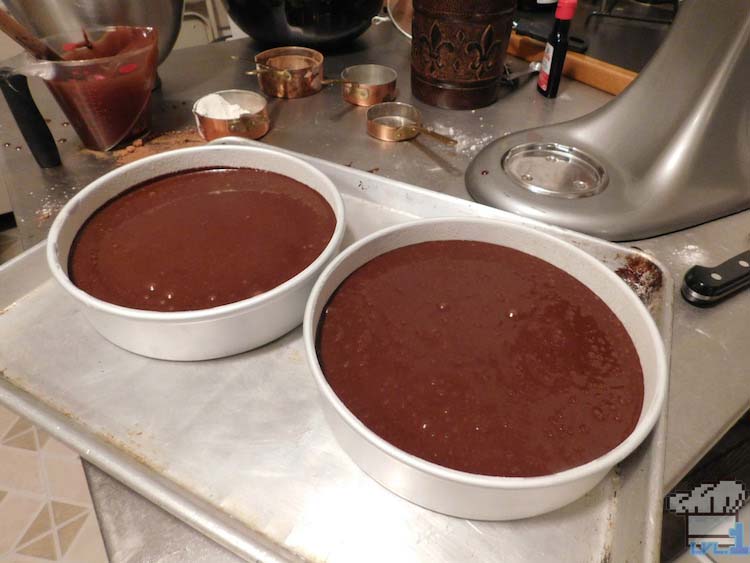
- Use a toothpick, inserted in the center to the cake, to tell if it is done. It should come out with only minimal crumb sticking to it. If there is anything that still looks liquidy on the toothpick, give the cake 5 more minutes in the oven and then try again.
- Once the cakes are done, remove them from the oven and place them somewhere to cool for about 10 minutes. Take a sharp knife, or small offset spatula, and run it along the inside of the pan to make sure the cake won’t stick; then invert the pan onto a plate and shake slightly until the cake releases completely. Place another plate (or cake round) on top of it (the bottom) and turn it back right side up. Do this for both cakes, and let them cool completely. Alternatively, you can wrap them in plastic wrap and leave them in the refrigerator overnight. You may want to consider skipping ahead to making the buttercream now, while the cake is resting, so it’s ready to go once the cake is cool.
- When the cakes are completely cool, we can go about what’s called “torting” them. This is made much easier with a cake turntable, but if you don’t have one you can place the plate, or cake round, on a sheet of parchment on a clean surface to help you turn the cake more easily.
- The first step is to remove the domed top of the cake. Align a serrated knife along the cake where it begins to dome and gently saw back and forth, while slowly rotating the cake. Once you have made an incision all the way around, you can apply a little more pressure and begin cutting further into the cake. Keep rotating it and make sure your knife stays parallel to the table so you get an even cut. Once your knife has cut all the way across the cake you’ll be able to remove the domed top (keep it for snacks!).
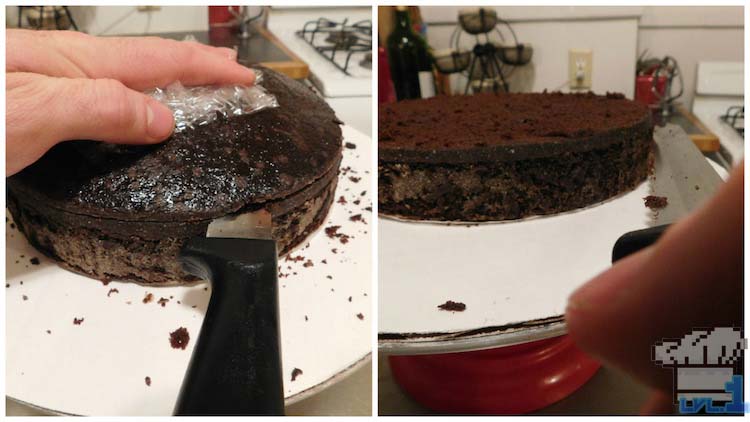
- Next, we’ll be cutting the cake we have in front of us into 2 layers in much the same way as we removed the top. Disclaimer: if you don’t feel confident enough to attempt this cut, you can leave it intact and make a 2 layered cake instead of a 4 layer one. Anyway, do your best to approximate halfway up the side of the cake, and begin your incision. Remember to keep rotating the cake all the way around before you start really cutting into it, this will give you a good guideline to work with and can ensure your layers are flat. By the end we should have gotten a total of four chocolate cake layers out of the two cakes. Good job!
+ Chocolate Buttercream +
Recipe adapted from Baked Explorations by Matt Lewis and Renato Poliafito
ITEMS
| Ingredient | Amount |
|---|---|
| Egg Whites | 5 each |
| Sugar | 1 1/2 cups |
| Vanilla | 1 tsp |
| Butter (softened) | 1 lb (4 sticks) |
| Dark Chocolate (melted, but not hot) | 8 oz |
EQUIP
- Electric Stand Mixer
- Small Sauce Pot
- Whisk
- Microwave-safe Bowl (for the chocolate)
- Rubber Spatula
WALKTHROUGH
- This buttercream starts with what’s called a Swiss Meringue. This is a way of combining egg whites and sugar, over a pan of simmering water, so that the temperature slowly increases and the sugar dissolves. Begin by setting a small sauce pot, half filled with water, on the stove over high heat. In the bowl of an electric mixer place your egg whites, along with the 1 1/2 cups of sugar. Remove the bowl from the machine and whisk by hand until combined (fig.1 below).
- Once the water has begun to boil, reduce the heat to medium low and place the bowl of the electric mixer over top of it (fig.2 & 3 below); this is called a double boiler. Be careful to make sure the bottom of the bowl isn’t actually submerged in the water.
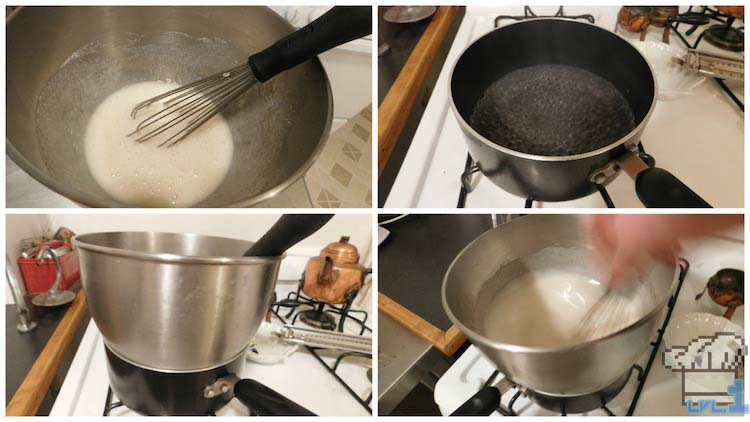
- Whisk continuously, so as to not allow any part of the mixture to overcook. After about two minutes, check the meringue. You’ll be checking for two things: temperature and, for lack of a better word, grittiness. The goal here is to warm the egg whites enough so that the sugar dissolves completely and you can no longer perceive any “grit.” Once all the sugar is dissolved and the egg whites feel very warm to the touch, remove the bowl from the pot of water and return it to the stand mixer.
- While it’s still warm, add the vanilla, fit the electric mixer with the whisk attachment, and whip the meringue on high speed until it has cooled, increased in volume, and become glossy.
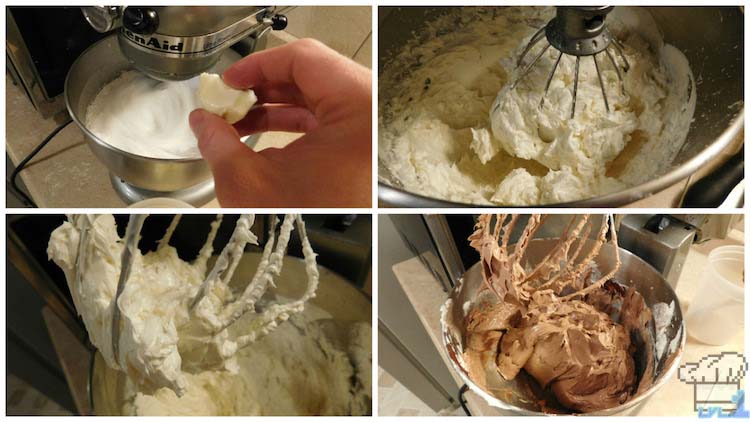
- The softened butter should be soft enough that you can pinch off small pieces with your fingers. Add these small pieces one by one to the mixer as it continues to whip on high speed. To give you an idea, I usually add my pieces of butter at 4-5 second intervals. Eventually the mixture will come together (fig.2 above), but keep adding the remaining butter and whipping until the buttercream is very smooth and light (fig.3 above) — usually within four minutes after all the butter has been added.
- Stop the mixer and add your melted chocolate. Make sure it’s not too hot, or it will melt the butter on contact. Run the machine at medium speed in order to fully incorporate the chocolate. Use a rubber spatula and scrape down the sides of the bowl to make sure there aren’t any lingering streaks of unmixed buttercream.
You’ve done it! Now it’s time to assemble your cake.
+ Portal Cake Assembly +
ITEMS
| Items | Quantity |
|---|---|
| Chocolate Cake Layers | 4 each |
| Chocolate Buttercream | 1 qt |
| Chocolate Chips/Chunks | 10 oz |
| Whipped Cream | as needed |
| Maraschino Cherries | 6 each |
| Candle | 1 each |
| Science | as needed |
EQUIP
- Offset Spatula
- Sharp Knife
- Cutting Board
- Parchment Paper
- Recommended: Cake Turntable
WALKTHROUGH
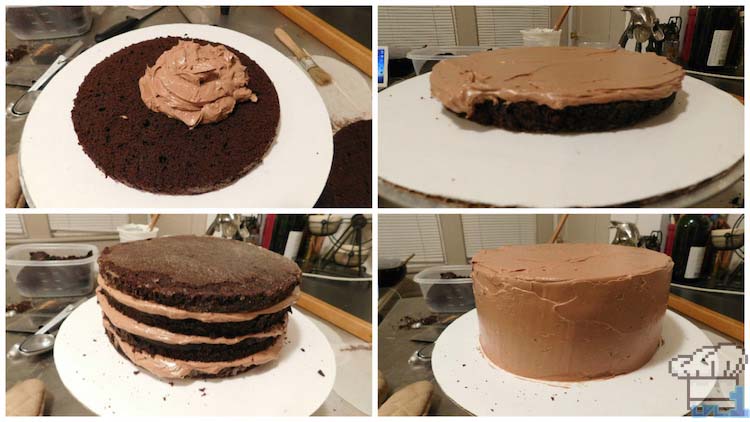
- Ok, this is it, the big pay off. Begin by placing a single chocolate cake layer (remember to remove the parchment paper circles from the bottoms if you haven’t already!) on your base and adding about 3/4 cup of the buttercream. Use an offset spatula to smooth it out, before placing another cake layer on top and repeating the process. Make sure the final cake layer you add is an inverted bottom layer so the top of the cake will be as flat as possible.
- Once you have assembled the layers, use the remaining buttercream to frost the sides of the cake. Because we’ll be pressing chocolate chips into them, the sides don’t need to look perfect, but there should be complete coverage of the cake (fig.4 below).
- Next we’ll be chopping up the chocolate to be pressed into the sides and top of the cake to give it that iconic look from the game. We want to chop the chocolate into small pieces, but not too small that they get lost in the frosting.
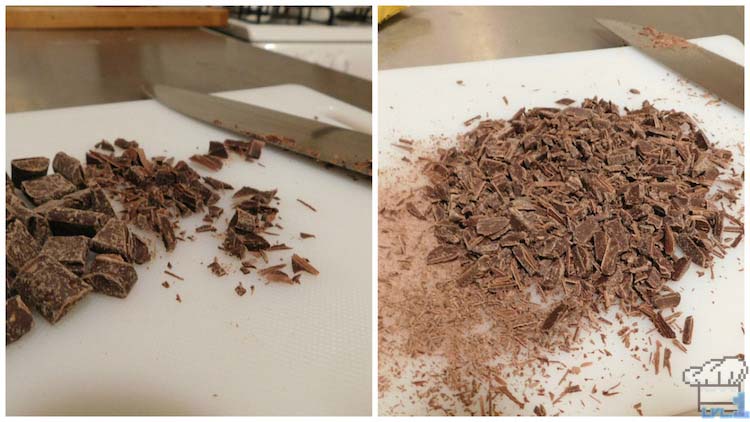
- Now comes the messy part of actually applying them. Spread out two large pieces of parchment paper out on your work area to catch all the extra chocolate that will inevitably fall. The idea is to take a handful of chocolate and gently push it into the side of the cake so that it imbeds and sticks to it. It’s important that your hands don’t become too warm while applying the chocolate, or it can begin to melt. if you notice this beginning to happen, wash your hands and then run cold water over them before drying them off, as normal. You’ll be applying much more chocolate at any one time than you may expect, but all of the extra that doesn’t stick will fall off the cake onto the parchment you laid down and can be collected and reapplied somewhere else. I think pictures do a much better job explaining the process here, honestly.
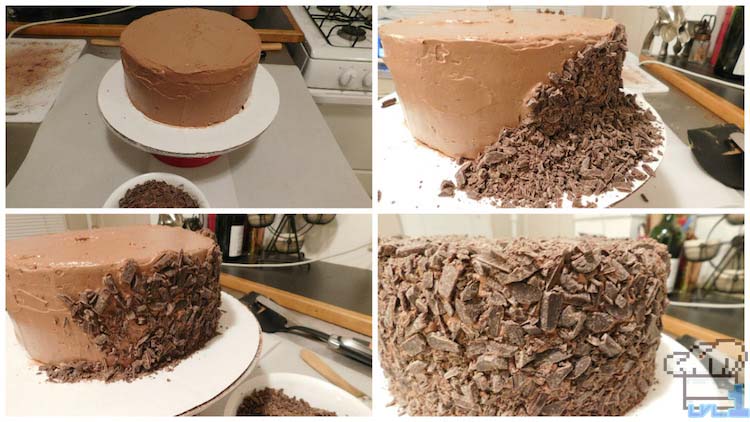
Just keep applying the chocolate until all of the frosting has been covered. Personally, I think it’s easier to do the sides of the cake first and then to do the top. - Now we just have a couple more garnishes to do and we’ll be done! In order to get the cake to look like it did in game, we need whipped cream and cherries. The amount of whipped cream is so small that I don’t think it requires a recipe here. If you want to make it yourself, just whisk up some heavy cream and confectioner’s sugar. Alternatively, just buy some :P. Make six dots of whipped cream around the outside of the cake and place a cherry on top of each of them. All that’s left is to grab a candle for the center and you’re pretty much done! Nice work!
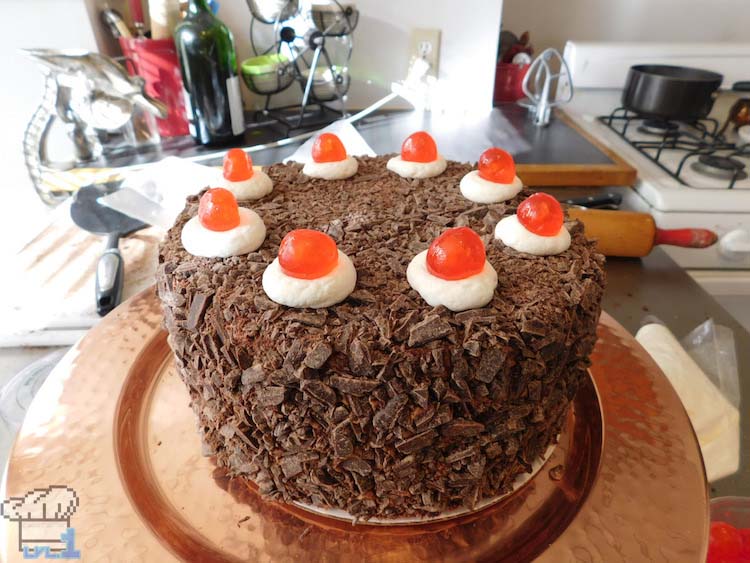
…I’m making a note here: Huge Success.
Hey! Thanks for reading all the the way to the end! You’re awesome :D! If you haven’t already and are looking for more nerdy food stuff, consider following me on Twitter, Facebook, tumblr and Instagram. I post a lot of work in progress pictures for the blog as well as some stuff from my real job as a pastry chef. If that sounds like something you’d be into, please check out those links above! Anyway, take care everyone and I’ll see you soon with an all new recipe!

